Welcome to my blog!

Hi!

I invite you to please visit some of my blog posts below and have a look at the projects that I've created with the wonderful Stampin' Up! product range.

If you would like a current Stampin' Up! catalogue please email me!

Monday, February 29, 2016

Stampin’ Up! Australia - Stampin’ Up! Pretty Petals DSP

Hi!

Welcome to this week's Artful Stampers Blog Hop and welcome from Jane’s blog.


Here are the essentials:

  • I went to my often neglected pile of Designer Series Paper stacks...this one is Pretty Petals. 
  • I made a square card and an custom envelope to match from the In Colors Envelope Paper in Tip Top Taupe. I did some tone-on-tone stamping & masking with the line stamp from Tin of Cards and made an address window. :)
  • The greeting is from Tin of Cards and the background flower is from Botanical Blooms (stamped off once in Calypso Coral)
  • Embellishments....I like having my embellishments in threes so I used 3 Calypso Coral Candy Dots in the top left corner. 
  • Gasp - ribbon! I hardly ever use ribbon on my cards as I have a mental block with bows so I did a faux-bow...essentially a knot...with the Tip Top Taupe Lace Ribbon....it’s so pretty! 
  • The layout is from Freshly Made Sketches this week.  

Here are our colours for this week:


Here is the sketch from Freshly Made Sketches:


To follow the blog hop, just click the arrows below.
http://wp.me/pmvgD-2eW    http://richesstitches.blogspot.com/2015/12/the-artful-stampers-blog-hop-65.html
Stamp - Botanical Blooms, Tin of Cards
Ink - Tip Top Taupe, Calypso Coral
Cardstock -Very Vanilla, Old Olive, Calypso Coral, Pretty Petals DSP
Tools - Stampin’ Trimmer, SNAIL, Stampin Dimensionals
Accessories - Tip Top Taupe Lace Ribbon, Candy Dots - Subtles


Cheers
Are you one of my 16000+ Pinterest followers?
Have you 'Liked' me on Facebook?
Have you tagged me on Instagram?
Have you tweeted me on Twitter?

Thursday, February 25, 2016

Stampin’ Up! Australia - Tin of Cards Birthday Card

Hi

Welcome to this week's Create with Connie and Mary Thursday Challenge.


Here are the essentials:

  • I used some scraps of Cherry on Top DSP (including the tag) and teamed them with some of the new Metallics Gold Glitter Tape. 
  • Stamp on your patterned paper...the black archival ink is perfect to get a bold stamped image over a busy background. I used the birthday sentiment from the Tin of Cards stamp set on my DSP tag. 
  • The cotton paper is fantastic for making flowers....I punched 12 flowers with the pansy punch and secured with a brad...just scrunch the layers until you get a flower! 
  • My card looked a bit naked even after I added the flower and ribbon so a scattering of sequins was in order. :)

Here is our sketch for this week:


Card recipe

Stamp - Tin of Cards
Ink - Archival Black ink
Cardstock - Whisper White Thick cardstock, Cherry on Top DSP, Cotton Paper
Tools - Stampin' Trimmer, Stampin’ Dimensionals, SNAIL, Tag Topper Punch, Pansy Flower Punch
Accessories - Metallics Sequins, Metallics Gold Glitter Tape, Satin Ribbon Basic Black, Gold ribbon

I hope you will join in and create a card with us.....and please feel free to leave me and the other CCMC participants some comments! :)

Cheers
Are you one of my 16,000+ Pinterest followers?
Have you 'Liked' me on Facebook?
Have you tagged me on Instagram?
Have you tweeted me on Twitter?

Monday, February 22, 2016

Stampin’ Up! Australia - Stampin’ Up! Butterfly Bokeh

Hi!

Welcome to this week's Artful Stampers Blog Hop and welcome from Tamsin’s blog.


Here are the essentials:

  • This card was pulled together from scraps.....seriously...it was!
  • The base is Kraft and then theres a layer of Very Vanilla card stock stamped with Hardwood in Crumb Cake and then sponged and ‘distressed’ with Gorgeous Grunge. I had this layer in my stash as it didn’t make the cut for another card. 
  • The bokeh layer was done so long ago that I can’t remember the colours....but any tones in yellow, orange, pink and green would work if you wanted to reproduce this. 
  • You can stamp on vellum and it comes out beautifully soft. I chose vellum to let the bokeh layer through. I stamped a sentiment from Botanicals for You in Crumb Cake
  • The Pool Party butterfly framelit was also an off-cut. You may also notice that the frame-lit has had surgical enhancement. The two pointy bits at the bottom were too low for my card, so I creatively snipped them off and made sure that the edge had a curve like the rest of the butterfly. 
  • A vellum butterfly and a metal-rimmed pearl are the perfect finishing embellishment. 

Here is our sketch for this week:


To follow the blog hop, just click the arrows below.
http://wp.me/pmvgD-2eW    http://richesstitches.blogspot.com/2015/12/the-artful-stampers-blog-hop-65.html
Stamp - Botanicals For You, Hardwood, Gorgeous Grunge
Ink - Crumb Cake + assorted inks for bokeh layer
Cardstock - Kraft, Watercolour, Very Vanilla, Vellum, Pool Party
Tools - Stampin’ Trimmer, SNAIL, Aquapainter, Glue Dots, Elegant Butterfly Punch, Big Shot, Bold Butterfly Framelit Die
Accessories - Metal Rimmed Pearl


Cheers
Are you one of my 16000+ Pinterest followers?
Have you 'Liked' me on Facebook?
Have you tagged me on Instagram?
Have you tweeted me on Twitter?

Thursday, February 18, 2016

Stampin’ Up! Australia - Stampin’ Up! Butterfly Framelit Die

Hi

Welcome to this week's Create with Connie and Mary Thursday Challenge.


Here are the essentials:

  • No white cardstock!! A complete departure of style for me, but only in the colour department...I've still kept the design simple and let the colours speak for themselves.
  • Kraft + wood. Wooden elements work beautifully with Kraft cardstock - try it!
  • Keep the die cut intact. I kept the intricate pieces of the butterfly intact for effect - just make the Big Shot sandwich shallower so that the pieces don't get cut all the way through.
  • Use up your DSP! I used a sheet of the Bermuda Bay stripey DSP from the Shine On Specialty DSP pack.  

Here are our colours for this week:


Card recipe

Stamp - none!
Ink - none!
Cardstock - Melon Mambo, Bermuda Bay, Shine On DSP
Tools - Stampin' Trimmer, Stampin’ Dimensionals, SNAIL, Bold Butterfly Framelit Die, Big Shot, Fine Tip Glue Pen.
Accessories - Natural Expressions Element

I hope you will join in and create a card with us.....and please feel free to leave me and the other CCMC participants some comments! :)

Cheers
Are you one of my 16,000+ Pinterest followers?
Have you 'Liked' me on Facebook?
Have you tagged me on Instagram?
Have you tweeted me on Twitter?

Wednesday, February 17, 2016

Stampin’ Up! Australia - Stampin’ Up! Work of Art

Hi!

The inspiration image at The Card Concept's challenge this week is a vibrant mix of colourful flowers.


Here’s the inspiration image.....


I hope you like my card! :)

Card recipe
Stamps - Work of Art, Tin of Cards
Ink - So Saffron, Mint Macaron, Real Red
Cardstock - Mint Macaron, Whisper White, Mint Macaron DSP  
Tools - Stampin' Trimmer, SNAIL, Glue Dots
Accessories - Boutique Accents In Color Embellishments (Watermelon Wonder)

The brand NEW Occasions catalogue and the Sale-A-Bration catalogues are out now. If you would like your own copy (Australian readers only), just send me an email. :)


Cheers

Visit my online store for Stampin' Up! supplies.
Are you one of my 16000+ Pinterest followers?
Have you 'Liked' me on Facebook?
Have you tagged me on Instagram?
Have you tweeted me on Twitter?

Monday, February 15, 2016

Stampin’ Up! Australia - Stampin’ Up! Schoolhouse DSP

Hi!

Welcome to this week's Artful Stampers Blog Hop and welcome from Amanda's  blog.


Here are the essentials:
  • Let the DSP take centre stage. The gray numbers-patterned design from Schoolhouse DSP was perfect for this theme and the sketch
  • Diagonal? The pattern on this sheet of DSP isn’t diagonal, but you can easily change the orientation of any DSP if you like. I used the inspiration from CASE This Sketch and rotated the paper to suit. 
  • Need a coloured 3D sentiment...emboss it! If you have a wooden sentiment but you want a white finish on it, just cover it in Versamark and heat emboss it. I used two layers of White Emboss Powder + one layer of Iridescent Ice. White & sparkly! 
  • Layer the DSP. By putting a narrow layer of Basic Grey card stock around the Schoolhouse paper, it finishes the card and makes the patterned paper pop.
  • Make your own matching envelope. During the process of cutting a diagonal piece of DSP resulted in a triangular piece of DSP as an off-cut, I thought it would make a great envelope liner so I made my own envelope with the Envelope Punch Board and the Neutrals Envelope Paper

Here is our theme for this week....


Here’s the sketch from CASE This Sketch


To follow the blog hop, just click the arrows below.
http://wp.me/pmvgD-2eW    http://richesstitches.blogspot.com/2015/12/the-artful-stampers-blog-hop-65.html
Stamp - none! 
Ink - Basic Grey, Versamark
Cardstock - Whisper White Thick Cardstock, Basic Grey, Schoolhouse DSP
Tools - Stampin’ Trimmer, Stampin’ Dimensionals, Heat Tool, White Emboss Powder, Iridescent Ice Emboss Powder 
Accessories - Expressions Natural Element


Cheers
Are you one of my 16000+ Pinterest followers?
Have you 'Liked' me on Facebook?
Have you tagged me on Instagram?
Have you tweeted me on Twitter?


Thursday, February 11, 2016

Stampin’ Up! Australia - Stampin’ Up! Merry Moments DSP Christmas Card

Hi

Welcome to this week's Create with Connie and Mary Thursday Challenge.


Here are the essentials:

  • I was very time-poor this week so I thought I would get the Designer Series Paper to do all the talking. I took artistic licence with the sketch and the graphic snowflakes from Merry Moments are the circle elements from the sketch. 
  • Boo-boos! Don’t you hate it when something smudges on your card after you have stuck your layers down? My sentiment banner was going to be down the bottom of the patterned paper layer but a suspicious smudge appeared further up so the sentiment HAD to move. :)
  • Heat Embossing! You know how I said I was time poor?...well I have this mental block about heat embossing thinking that it is time consuming, but you know what...it isn’t! Just have all your tools out ready and it doesn’t take long at all. You need an Embossing Buddy, Versamark, Emboss Powder and your Heat Tool....plus a tray or some paper to catch excess powder. Easy and surprisingly quick! White always looks great on a dark background too. 
  • Don’t forget your embellishments....and they look better in threes! I used the White Perfect Accents here to add to the modern and simple look. 
  • Make Christmas Cards all year round. I make Christmas cards all year round so that I have about 80 to send out in early December....it means that November isn’t a mad rush to knock up a heap of cards. :)

Here is our sketch for this week:


Card recipe

Stamp - Embellished Ornaments
Ink - Versamark
Cardstock - Whisper White Thick Cardstock, Mossy Meadow, Merry Moments DSP, Real Red
Tools - Stampin' Trimmer, Stampin’ Dimensionals, SNAIL, Emboss Buddy, Heat Tool, White Stampin’ Emboss Powder. 
Accessories - Perfect White Accents

I hope you will join in and create a card with us.....and please feel free to leave me and the other CCMC participants some comments! :)

Cheers
Are you one of my 16,000+ Pinterest followers?
Have you 'Liked' me on Facebook?
Have you tagged me on Instagram?
Have you tweeted me on Twitter?

Monday, February 8, 2016

Stampin’ Up! Australia - Stampin’ Up! No Bones About It

Hi!

Welcome to this week's Artful Stampers Blog Hop and welcome from Leah’s blog

I’ve used No Bones About It again...I can’t get enough of those little dinosaurs on my cards!


Here are the essentials:
  • No Bones About It is a two-step stamping set. Stamp your background in a lighter colour (I used Sahara Sand) and stamp the second stamp in a darker colour (I used Chocolate Chip for the bones)
  • Shake it like a polaroid with the Squares Framelit Dies. These give cool window frames for that on-trend polaroid look. 
  • Layer some texture. I layered Naturals Chevron Ribbon and a strip of Cherry Cobbler for visual interest and colour. 
  • Use up your embellishments! If you are anything like me, you are way too sparing with embellishments. Throw some candy dots on for fun! 
  • Stuck for an idea??....visit one of the many challenge sites on the internet or visit here every Monday for a colour or sketch challenge idea. This week I’ve combined challenges (I often do!)...so I’ve used a sketch from Freshly Made Sketches and colours from our team colour challenge. :) I find that the colours and sketches will often guide me to a stamp set or design concept. 
  • Heat Embossing. White greetings look great on a dark background....solution...white heat emboss your greeting onto your dark card stock.
    1. Use an embossing buddy to remove static...just rub it over the card stock...a small layer of ‘dust’ will appear. This is normal and helps ‘dry’ your surface and removes the natural oils from your hands that stick to the card stock during crafting. Your powder will unfortunately stick to this residue if you don’t do this. 
    2. Stamp your greeting or image with Versamark. Versamark is a sticky ink....it’s magic really as the embossing powder will stick to it thus producing your finished image. 
    3. Gently pour your chosen colour of embossing power over your stamped Versamark image. I have a powder pal (now retired) to catch the excess powder but you can use a plastic container or even a piece of paper folded in half to catch the powder. This makes it easier to get all the powder back in the pot. 
    4. Got stray specks of powder? Invest in a very fine paintbrush from a craft shop and gently tap those specks away. 
    5. Grab your Heat Tool and slowly heat the surface of the emboss powder - some people heat from underneath the card stock but I heat directly on top of - not too close but close enough that you see the surface melt. It is magic!! 
Here’s an informative video from Stampin’ Up! to help you....


Here are our colours for this week:


Here’s the sketch from Freshly Made Sketches:


To follow the blog hop, just click the arrows below.
http://wp.me/pmvgD-2eW    http://richesstitches.blogspot.com/2015/12/the-artful-stampers-blog-hop-65.html
Stamp - No Bones About It
Ink - Sahara Sand, Chocolate Chip
Cardstock - Chocolate Chip, Whisper White, Night of Navy, Cherry Cobbler
Accessories - Neutrals Candy Dots, Naturals Chevron Ribbon
Tools - Big Shot, Squares Framelit Dies, Paper Trimmer, Paper Snips, 
Stampin’ Dimensionals, Heat Tool, Embossing Buddy, White Emboss Powder, Versamark


Cheers
Are you one of my 16000+ Pinterest followers?
Have you 'Liked' me on Facebook?
Have you tagged me on Instagram?
Have you tweeted me on Twitter?

Thursday, February 4, 2016

Stampin’ Up! Australia - Stampin’ Up! Kind Koala

Hi

Welcome to this week's Create with Connie and Mary Thursday Challenge.

Here’s my card! Isn’t that koala the cutest thing!!? As well as our colour challenge, I was also inspired by the Less is More challenge celebrating my homeland ‘Down Under’. Koalas are beautiful creatures....I have been fortunate enough to see several in the wild here.....most were asleep but I did see a large male crossing a road once....he was massive!


Here are the essentials:

  • I watercoloured my little koala by stamping Black Stazon onto White Shimmer Paper and applying Crumb Cake in very light layers with an aquapainter. Blushing Bride and a tiny bit of Rose Red were applied to the ears to give shading. 
  • I watercoloured the flower in Rose Red - this time adding more saturated colour. 
  • I thought it would be fun to mash up the greetings on this card. I like the “thinking of you” sentiment on the Kind Koala stamp, but I often think that this sentiment is better suited to sad situations....by adding “because you’re awesome” from Botanicals For You, the overall greeting on the card becomes whimsical and fun. 
  • I added a piece of Botanical Gardens Designer Series Vellum underneath the image layer. Vellum is great for adding interest to a clean & simple card without adding too much patterning or colour that competes with the eye. 
  • An Itty Bitty Epoxy Accent makes the middle of the flower pop! 

Here are our colours for this week:


Card recipe

Stamp - Kind Koala
Ink - Crumb Cake, Black Stazon, Rose Red, Blushing Bride
Cardstock - White Shimmer Cardstock, Botanical Gardens Designer Series Vellum
Tools - Stampin' Trimmer, Stampin’ Dimensionals, SNAIL, Aquapainter, Paper Snips
Accessories - Itty Bitty Accent Epoxy Stickers

I hope you will join in and create a card with us.....and please feel free to leave me and the other CCMC participants some comments! :)

Cheers
Are you one of my 16,000+ Pinterest followers?
Have you 'Liked' me on Facebook?
Have you tagged me on Instagram?
Have you tweeted me on Twitter?

Wednesday, February 3, 2016

Stampin’ Up! Australia - Stampin’ Up! Botanicals For You

Hi!

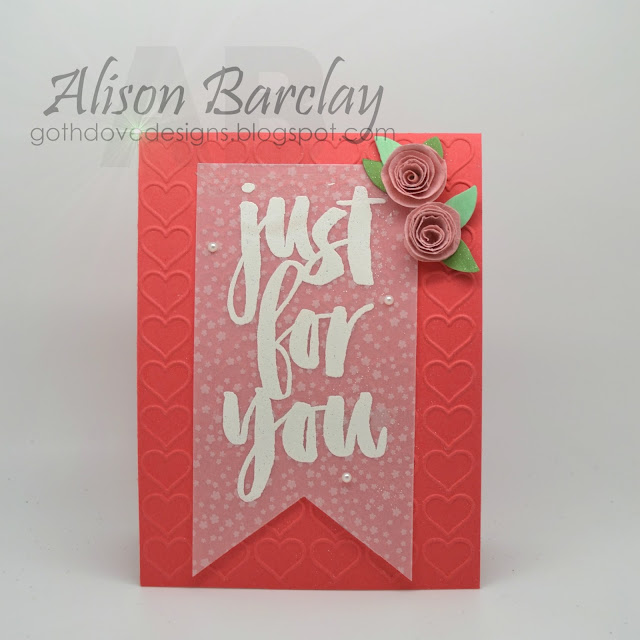
The inspiration image at The Card Concept's challenge this week suggests hearts, colour and flowers to me!


Here’s the inspiration image.....


Here are the essentials:
  • Watermelon Wonder card base was embossed with the Happy Heart Embossing Folder.
  • The greeting from Botanicals  For You was heat embossed onto a piece of Botanical Gardens Designer Series Vellum.
  • The vellum was adhered to the Watermelon Wonder card stock with Tear & Tape Adhesive...I was certain that it would show through but this stuff seems to be the ticket when it comes to invisible tape for vellum! YAY!
  • Rolled flowers were made by punching a 1 3/4 circle from a piece of Blushing Bride cardstock. The cardstock was crumpled and mashed so that I could peel the layers apart thus giving a 'suede' type look. I then rolled the flowers and adhered them to the leaves which were die cut with the Botanical Builder Framelit Dies.   
  • Flowers were painted with Wink of Stella Clear to give a glimmery finish. 


Card recipe
Stamps - Botanicals for You
Ink - Versamark, White Embossing Powder
Cardstock - Watermelon Wonder, Botanical Gardens Designer Series Vellum, Blushing Bride, Wild Wasabi, Mint Macaron 
Tools - Stampin' Trimmer, Big Shot, Happy Heart Embossing Folder, Banners Framelit Dies, Botanical Builder Framelit Dies, Paper Snips, Multipurpose Liquid Glue, 
Embossing Buddy, Heat Tool
Accessories - Pearls


I hope you like my card. Click on the links below to be taken to the recipe items in my online store.

The brand NEW Occasions catalogue and the Sale-A-Bration catalogues are out now. If you would like your own copy (Australian readers only), just send me an email. :)


Cheers

Visit my online store for Stampin' Up! supplies.
Are you one of my 16000+ Pinterest followers?
Have you 'Liked' me on Facebook?
Have you tagged me on Instagram?
Have you tweeted me on Twitter?

Product List
Big Shot
$169.00
Heat Tool
...